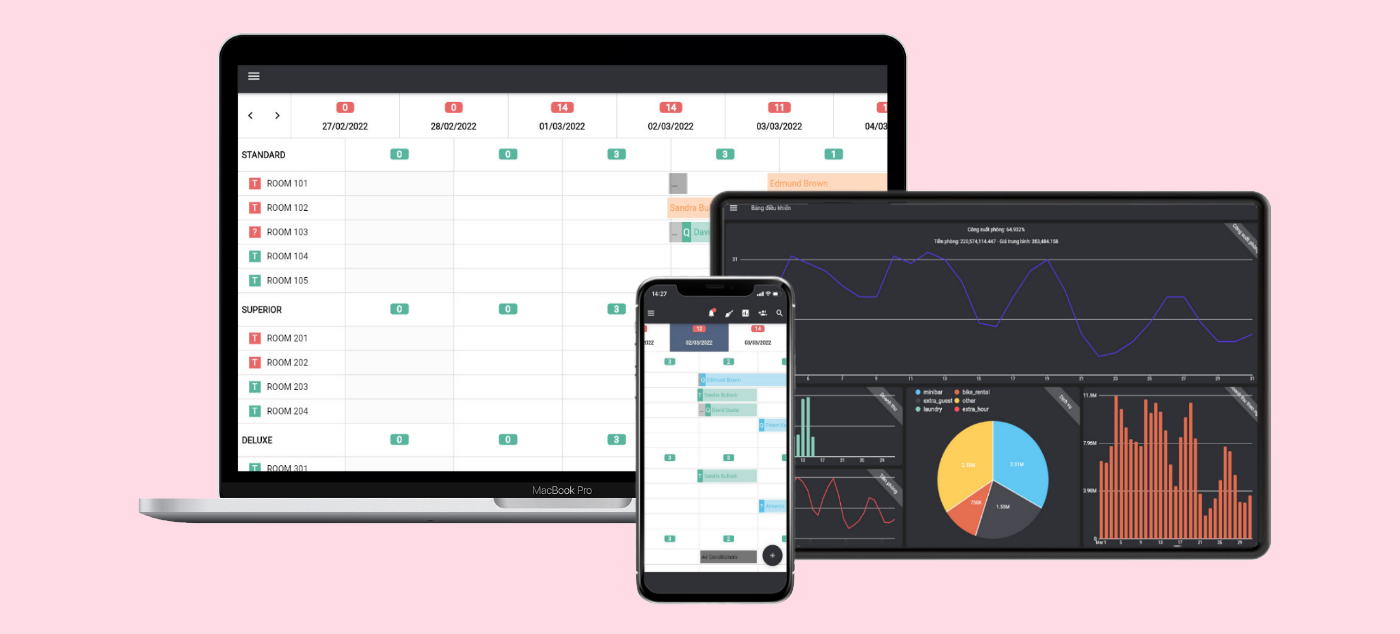
The most specific and detailed instruction sheet for using OnePMS Property Management System.
Please visit our channel Youtube to watch more detailed instructions and great tips on using OnePMS.
Install OnePMS Property Management System
Accessing to the link https://app.onepms.net/. Then, follow these steps to install OnePMS – Property management system on your device.
For Computer
After entering the main screen of One PMS via the link above, in the search bar, click on the icon ‘ Install OnePMS ‘, then select the button ‘ Install ‘, OnePMS will be automatically installed on your device.

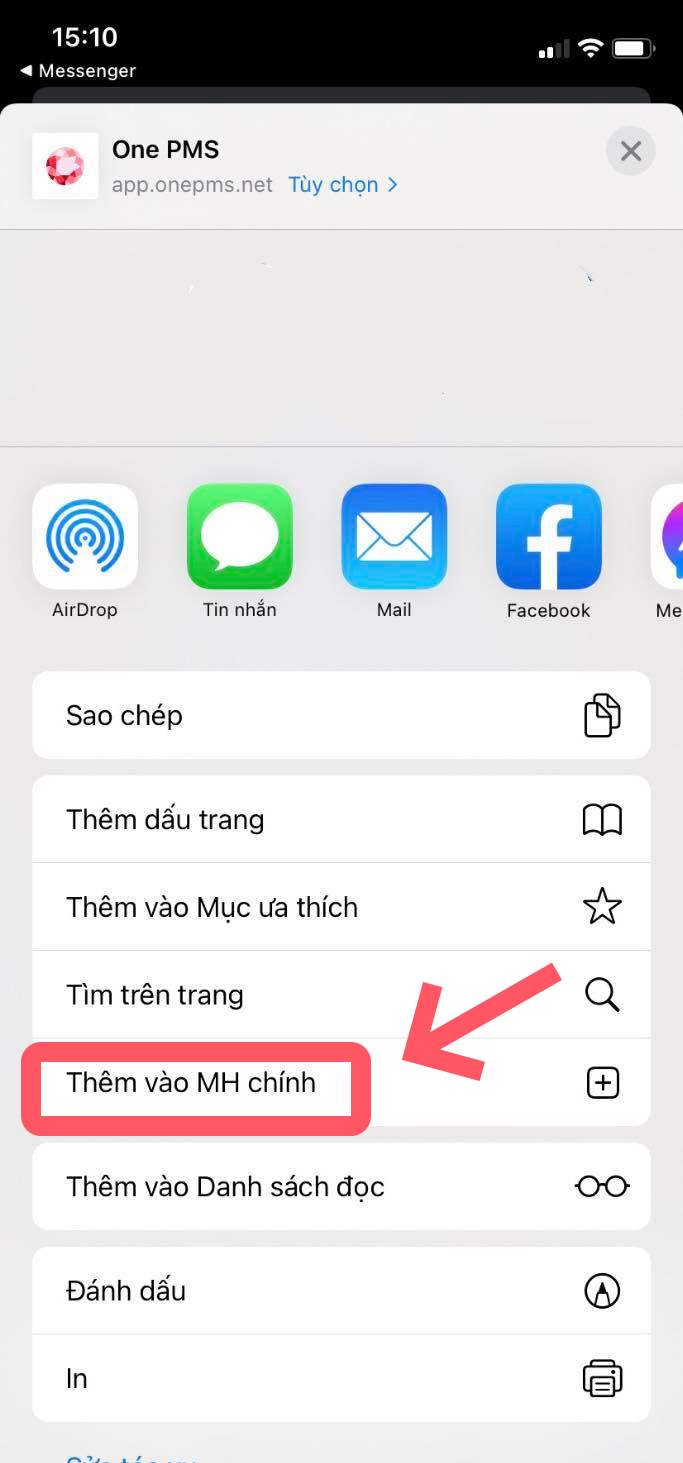
For iPhone
Open OnePMS on the Google browser, then click on the ‘ Options ‘ icon, select ‘ Add to home screen ‘, and the icon of OnePMS software will appear on the iPhone screen.

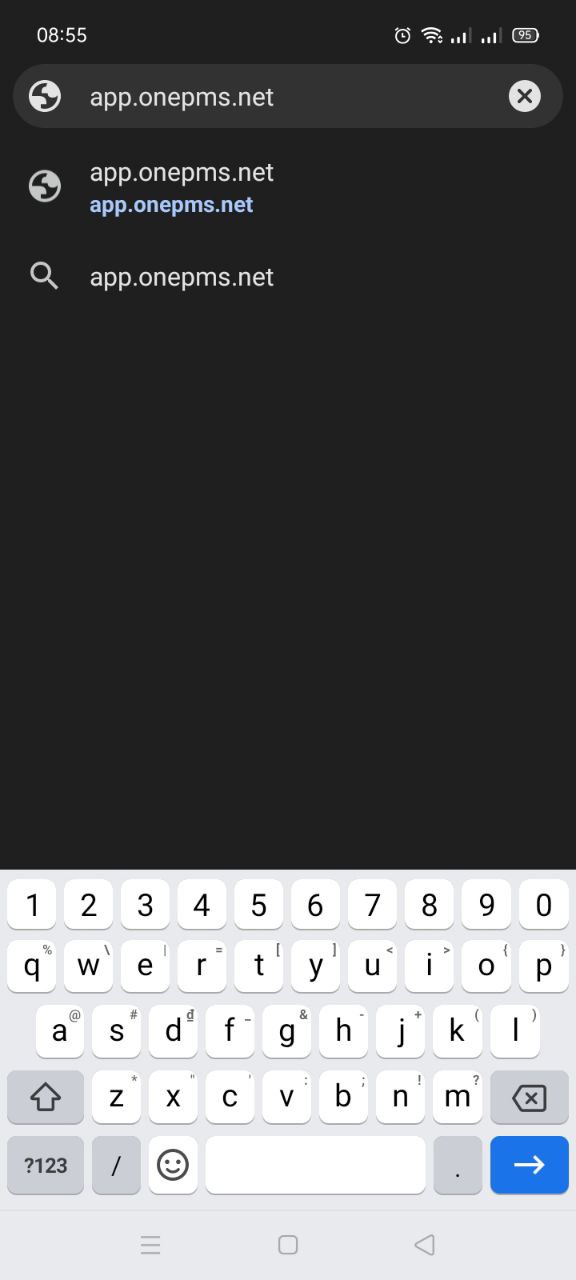
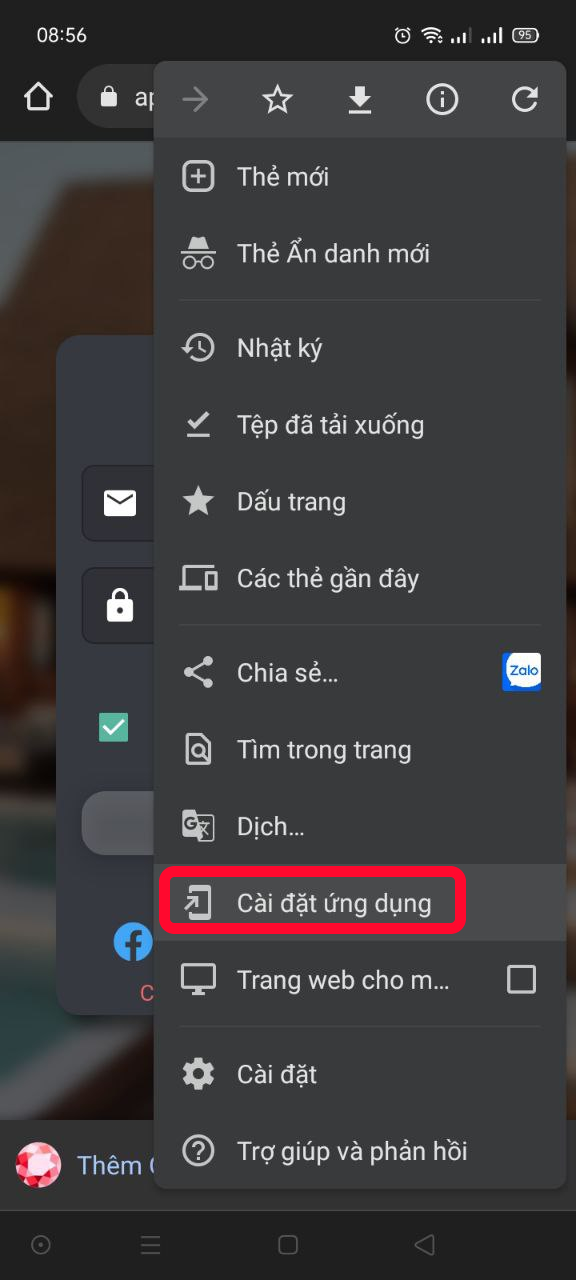
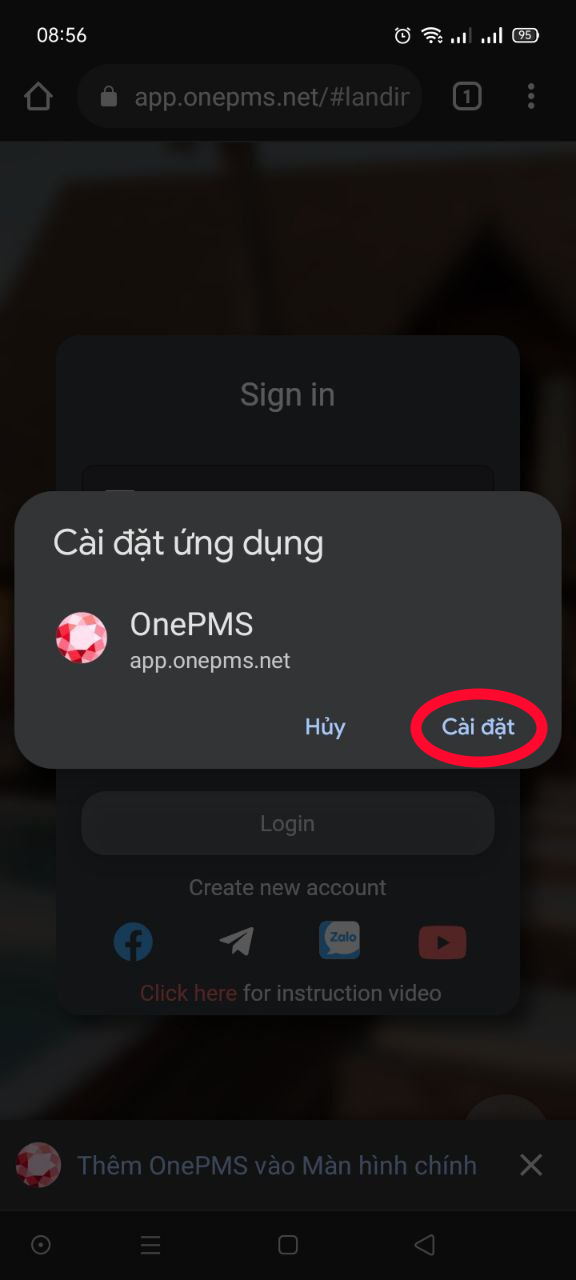
For Android devices
Open the application on the Chrome browser, click the Options button in the top right corner (3 dots), and a table of options will appear. Select Install application. Then, confirm Install, and the application icon will appear on the device screen.
#1: Create An Account
Everyone Who Wants To Access One PMS Property Management System Is Required To Have At Least One Account. To Create A New Account, Please Follow These Steps:
- From the Sign Up screen, select Sign Up for an account.
- The essential information panel will appear.
- Enter User’s Email, Password, Full Name, Phone Number.
- Click on custom to choose the gender.
- Select your date of birth by clicking the calendar icon.
- Select the user’s job location by selecting the down arrow next to Select a career.
- Enter your National ID, Country, City, and Address information.
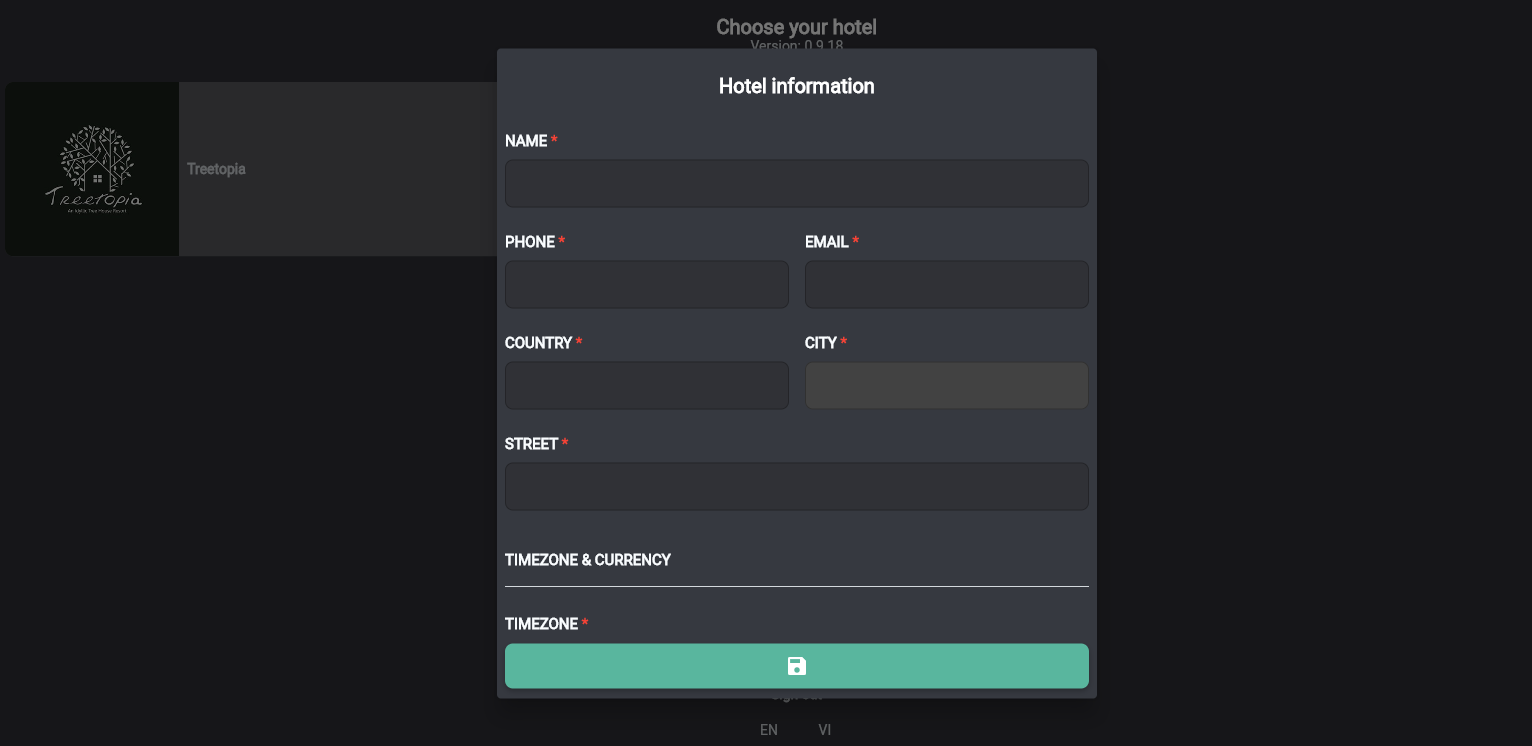
#2: Create Your Hotel
Once you’ve logged into your account as a hotel owner, the next step is to create your hotel information.
- From the bottom of the main screen, select the words Click here to create your hotel.
- The Hotel Info panel will appear.
- Enter Name, Phone Number, Email, Country, City, and Road as detailed as possible.
- Select a time zone by tapping the down arrow next to Time zone
- Select the currency used in your country.
- Choose a logo for the hotel by clicking the Choose image button, then you can upload an existing logo image from the device.
#3: Create Room Types And Rooms in One PMS – property management system
Create Room Class
After creating the hotel, the next step is to create the room categories that the hotel can offer to guests.
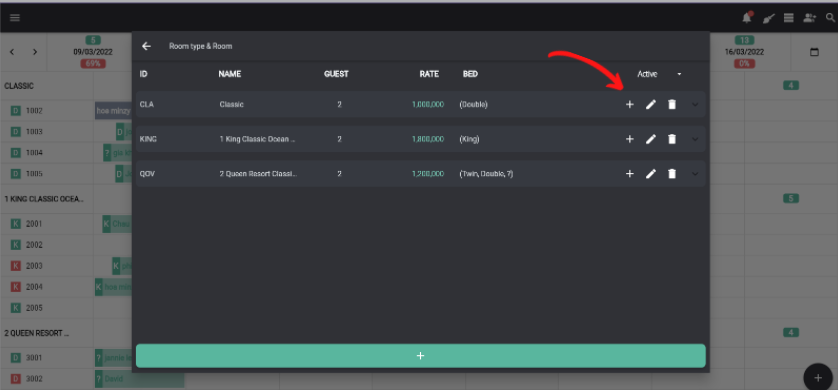
- Select Configuration, and items such as room and room class will be dropped down as shown below. Here, users can create new room classes as well as add rooms to existing room categories
- Click on Room and Room Class. Then, a table named Room and Room Class will appear.
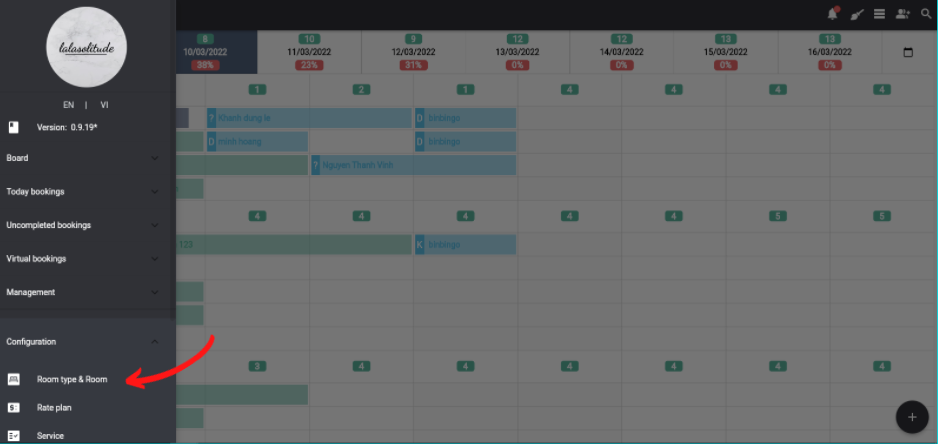
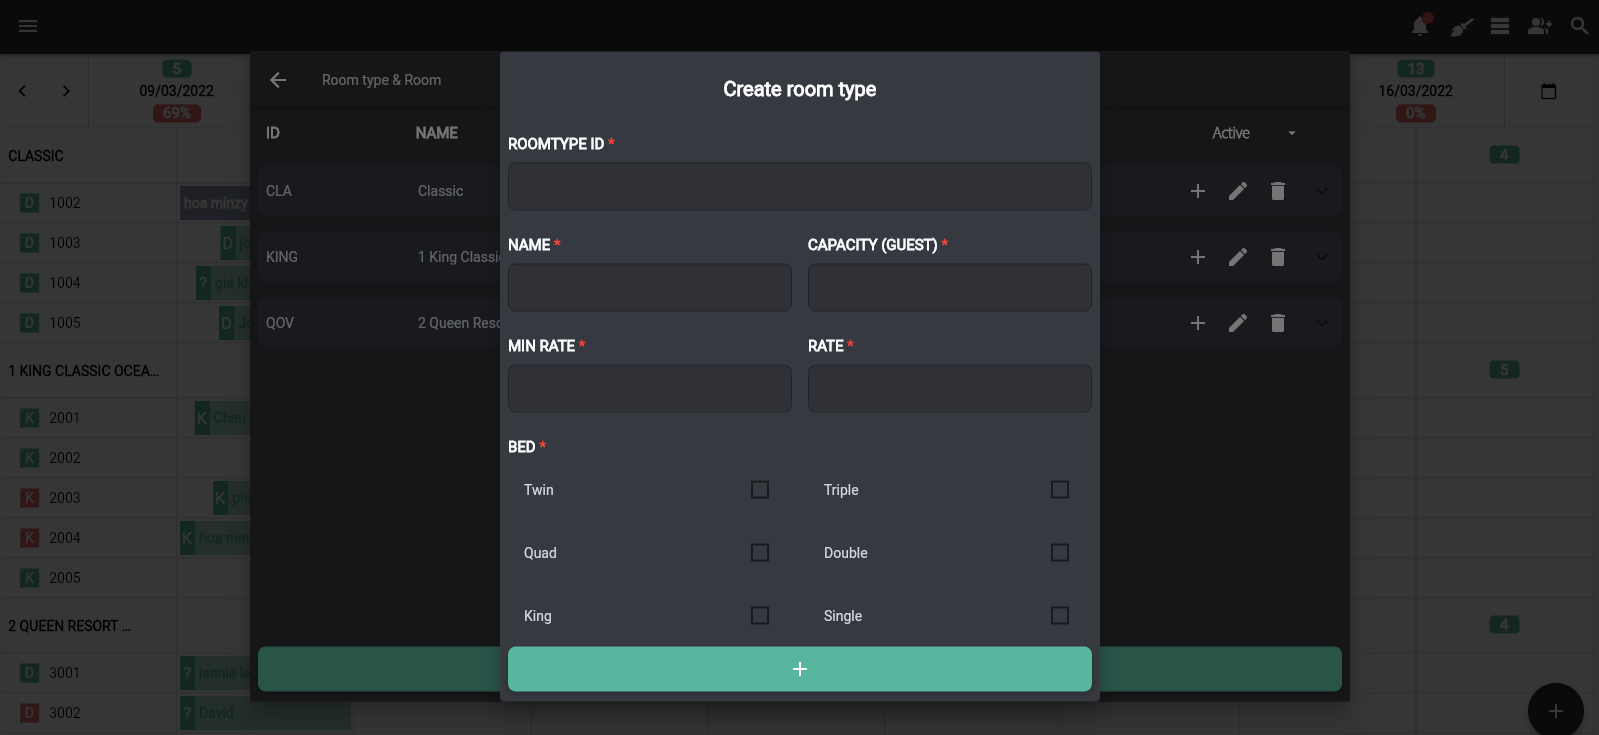
- Click on the plus icon at the bottom of the table, there will appear a table called Create room class.
- Enter Room Type ID, Name, Capacity, Minimum Rate, Price, and Bed Type.
- Room type ID: Code of each room type, making it easy for users to track room status.
- Name: The name of the room types included in the hotel.
- Capacity: The maximum number of guests that room type can accommodate.
- Minimum Rate: The lowest price accepted to be paid to guests for a room class.
- Price: The highest rate accepted to be paid to guests for a room class. This price is also clearly displayed on the information board when paying for customers.
- Bed Type: Beds that the room type is capable of providing to guests.
- Click on the save icon to finish saving the room class you just created.
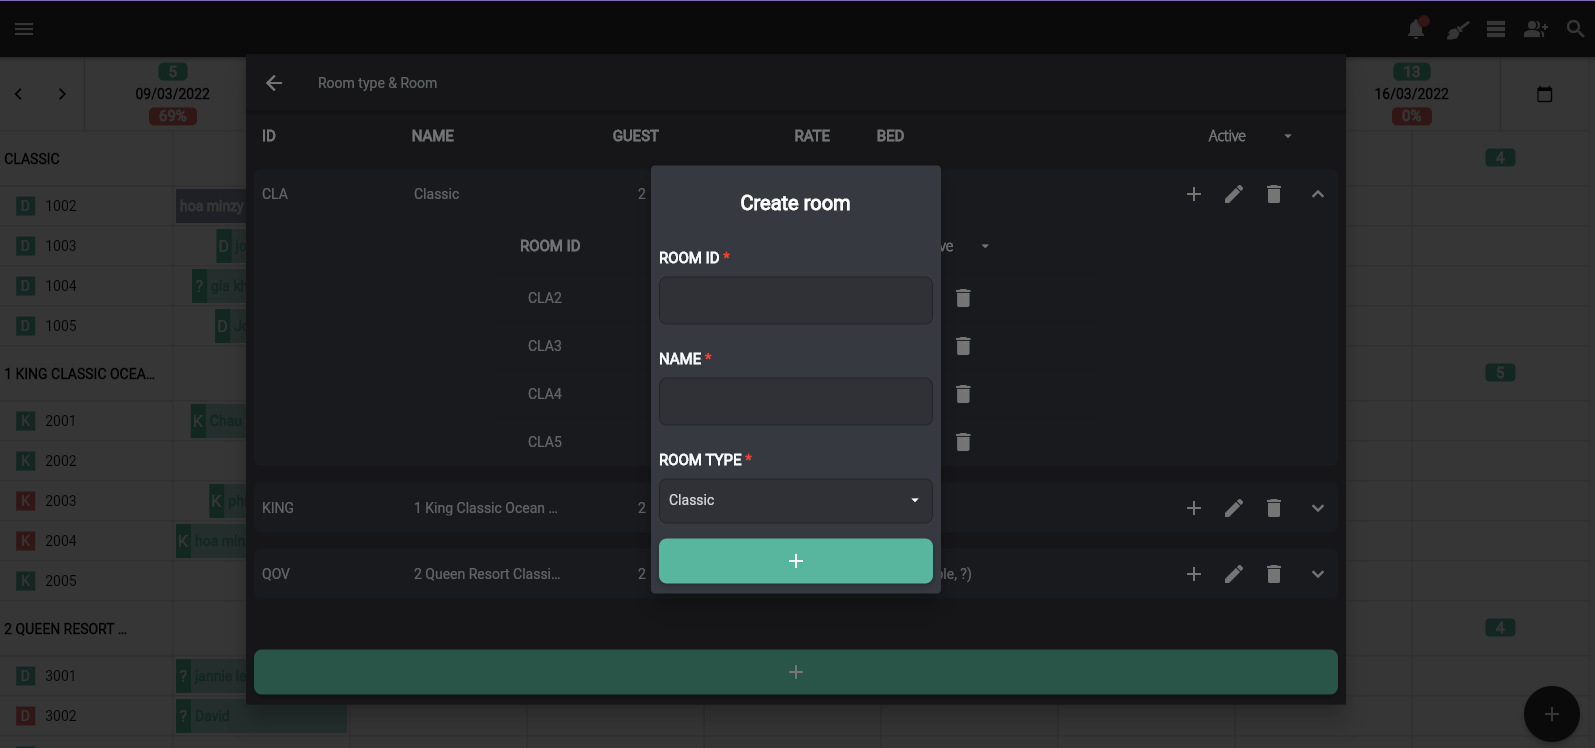
Create Room in OnePMS Property Management System
This Step Allows You To Create A Room Based On The Above Pre-Existing Room Categories In The Hotel Management Software OnePMS.
- From the Room and Room Class table, click on the small white plus as shown below to add a room.
- The Create Room panel will appear below including the following information:
- Room Code: A specific code for each room, making it easy for users to track the status of the rooms
- Name: Room name, can include both letters and numbers
- Room Class: Select the room class by clicking the down arrow button next to the room class name. This section includes all previously created room class
#4: Make A Reservation
In this section, you will be guided on how to create new reservations and edit existing reservations in the OnePMS property management system. Besides, we can use a few other functions to make serving customers easier.
Create A New Reservation in One PMS Property Management System
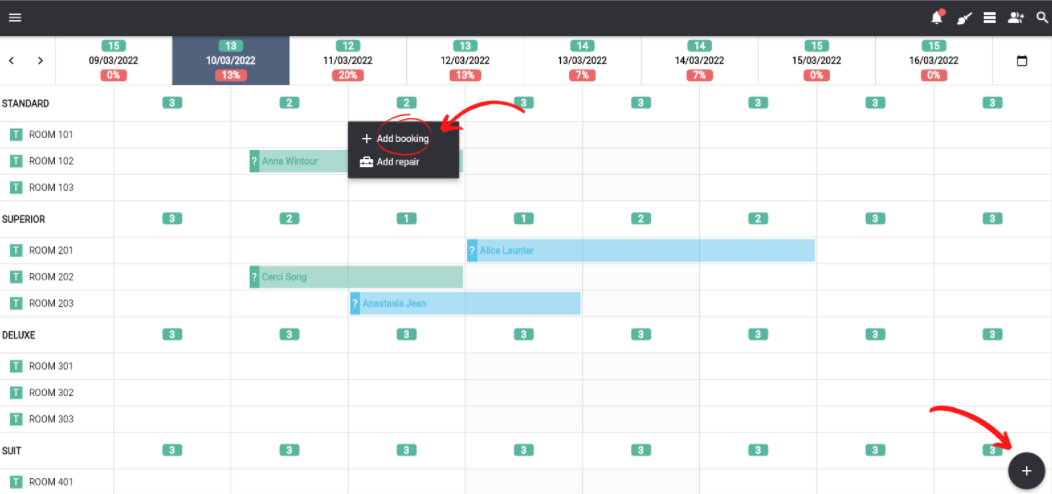
- Click on the box corresponding to the date that the guest has booked in the Status Table, then select Add reservation, the reservation screen will appear as shown below. Alternatively, you can add a new reservation by tapping the circle icon containing the plus sign in the lower-left corner of the screen.
- The Booking screen is divided into 2 parts: Overview and details.
- Overview: Includes basic guest information: Name, Phone number, Email, Arrival/Departure Date, Room Class, and Source.
- Details: Includes information about the accommodation that the guest has booked: Room, Bed, Number of adults and children, Rate, and Total.
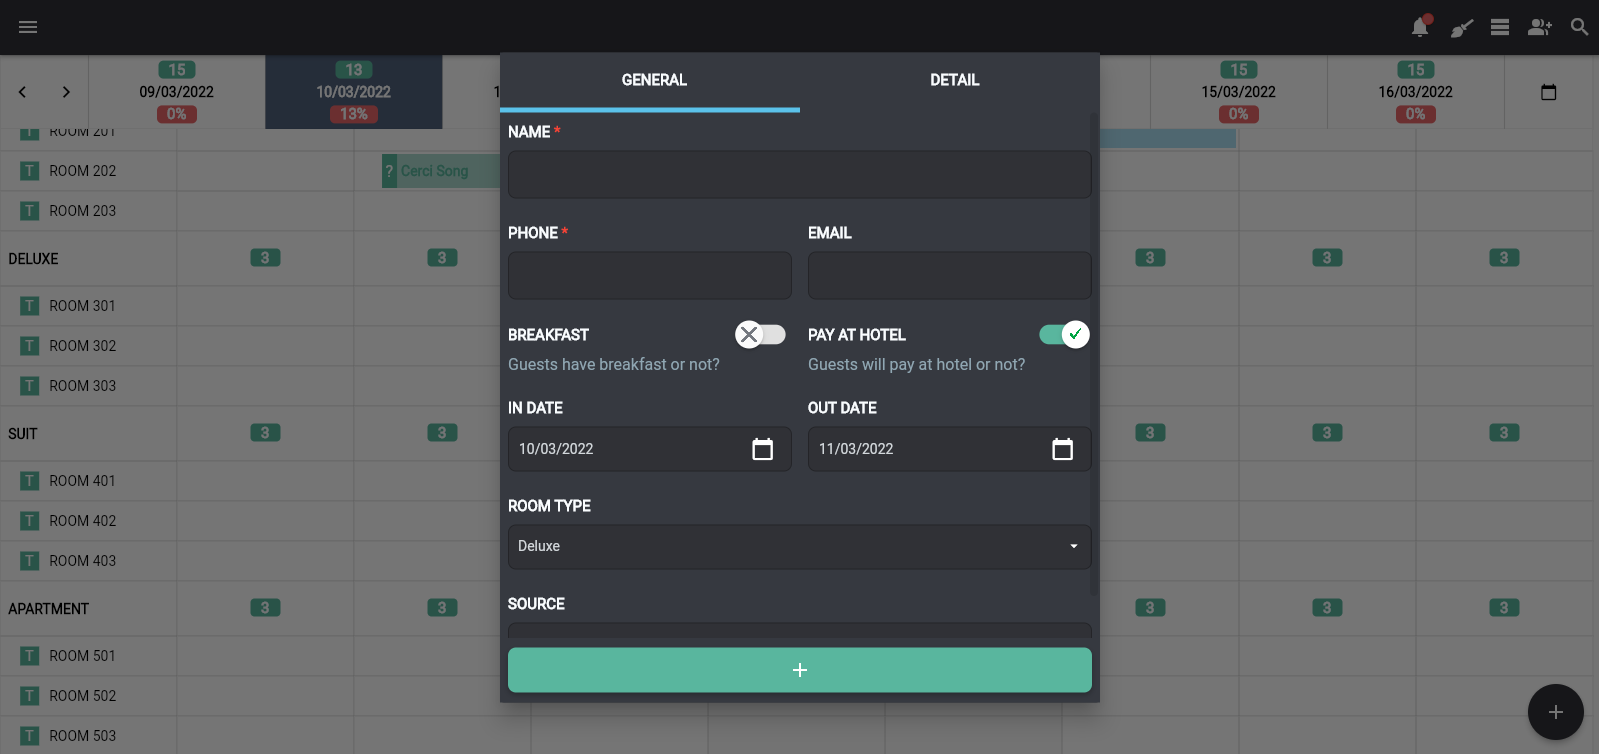
- After filling in the necessary information, click the green plus button at the bottom of the table to save your reservation
Edit Booking
In case the guest wants to change the date of stay, the manager can use this function to adjust the arrival/departure date
- Click on the box containing the information of the customer who wants to change the date of stay
- Select the details icon, and the previously entered information of the customer will appear
- Adjust the arrival and departure dates to match the needs of customers
- Click the save button at the bottom of the table
Note: The date the guest wants to change to must coincide with or after the current date in the calendar at that time. You can only change the date if the guest didn’t book your hotel through OTAs
Check-In
- Click on the blue box containing customer information about to check-in
- Select the landing plane icon (check-in)
- This box will turn green, which means the guest has successfully checked in
Note: You can only complete the check-in procedure successfully in case the room is in a clean condition and the previous guests have already checked out.
Check-Out
- Click on the reservation box where guests are staying (green)
- Select the check-out icon (the plane takes off), and the situation table below will appear
- Enter each specific payment in full or you can enter a one-time total payment in the Total payment section
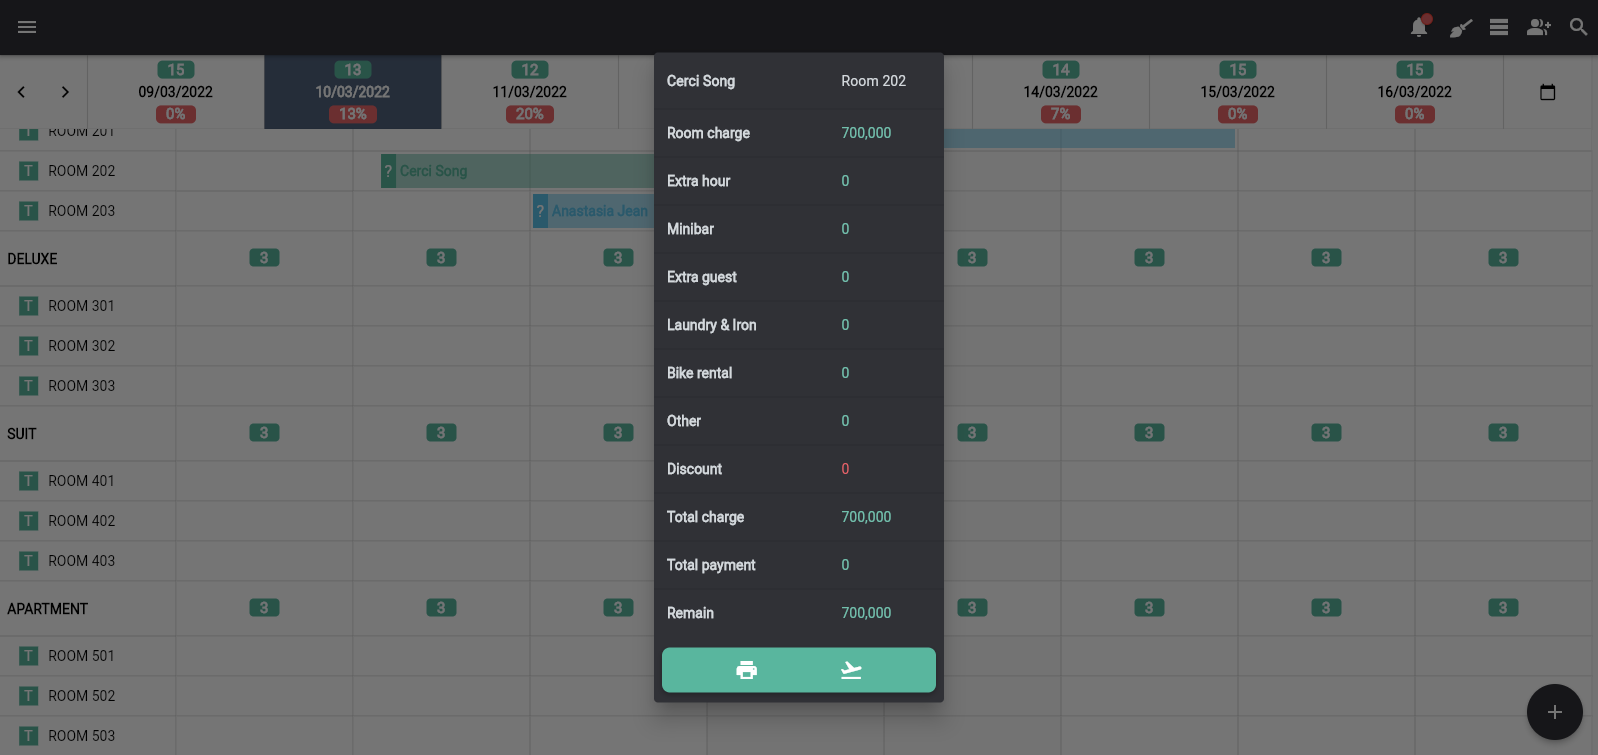
Note: You can only complete the check-out if the item Remaining amount is 0.
See more articles on How to track bookings today at this.
If you have any questions about OnePMS Property management system, please contact us through the following channel:
- Website: https://onepms.net.
- Zalo: https://zalo.me/g/zaksma521
- Telegram: https://t.me/onepms_cs
- Tiktok: https://www.tiktok.com/@onepms